Note: for more in-depth getting started videos, please see this multi-series playlist.
High-Level Walkthrough
Note: for more in-depth getting started videos, please see this multi-series playlist.
1. Prerequisites
- At this point, at least some of your endpoints should be set up and deployed with our JetPatch connector. If you still need help with this part, please visit the relevant setup guide for more information.
2. Configuring the Environment for Patching
Endpoints & Patches
Locating and pinpointing your specific endpoints and patches
Endpoints > Management
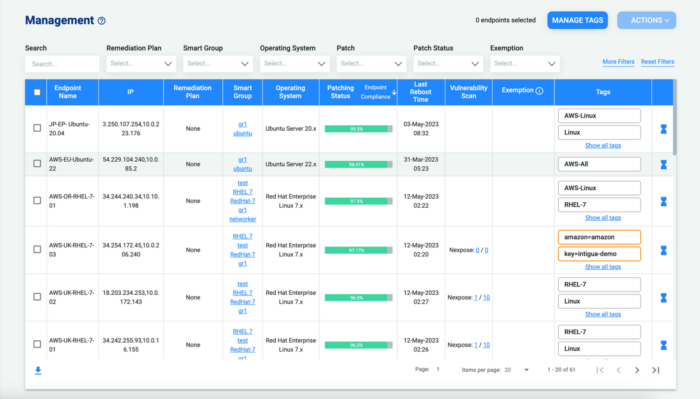
Endpoints Management drills down on specific endpoints. There are probably many endpoints in your environment; therefore, it’s best to sort using our filters in order to pinpoint the exact endpoint or endpoints you are looking for.
Patches > Patches Catalog
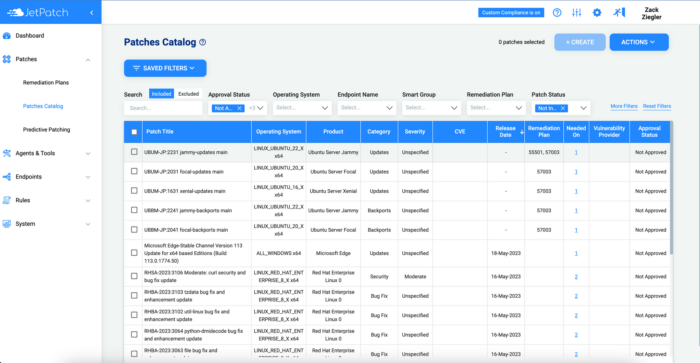
This page contains patches that were discovered from both Windows and Linux servers. In the Patches Catalog page, you can view how many devices the patch is needed on, which remediation plan the patch is associated with, and more useful metadata.
Among the filters shown, there is also a section here called more filters which dives into other ways to sort your environment. Once you have picked the filters you like, and or will use on a daily basis, it’s important to save them in our saved filters feature. Further in the guide, this feature can be leveraged to set up your automatic remediation plan(s).
Updating the Patch Inventory:
- Linux Patches will appear in the patch inventory once the Linux devices in your systems are connected and powered on. Please note it might take a few minutes for the initial patches to arrive. See this article for more information.
- Windows Patches: We update the Windows patches inventory every 24 hours. See this article for more information.
Creating a Saved Filter:
- Select the drop-down menu from ‘Saved Filters’ and then select ‘Save As…’
- Give a name and description and select ‘Save Filter’
- To edit, delete or view the saved filters table, go to the drop-down menu and select ‘Manage Saved Filters’
Groups & Maintenance Schedules
Organize and customize your environment to fit your needs
System > Smart Groups
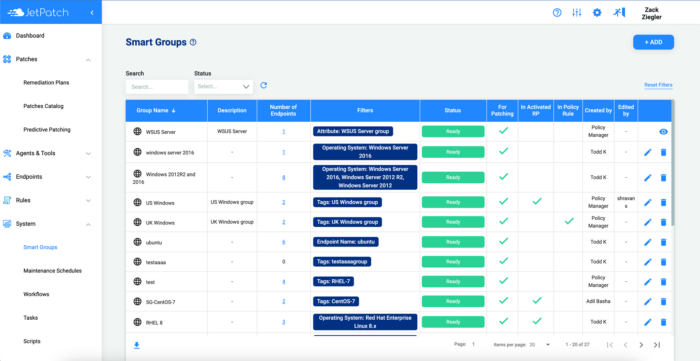
Smart Group Management allows you to create and manage groups of endpoints based on logical definitions, such as Operation System, Tags or Hostname. Once the group is defined and new endpoint with the same characteristics is created, it will automatically added to the relevant smart group.
Creating New Smart Groups
- Click on the
 button in the top right
 - Add group name and description and click on Add Filter button to select a filter for the group.
- Once the filter has been added the list of all end points that the filter applies to is presented for review.
- Click on Save Smart Group button in the upper right corner of the screen.
- Back on the Smart Groups screen the Status column presents the status of the group, during creation process the status is Creating Group, once the group is created the status is changed to Ready.
System > Maintenance Schedules
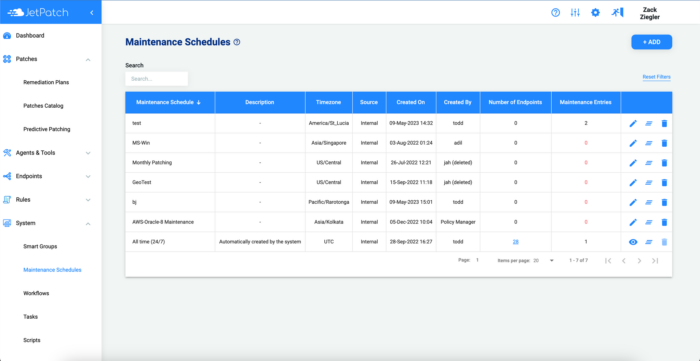
Maintenance Schedules are independent time slots that allow you to decide when you would like a Remediation Plan to run on your devices. Connecting a device to a Maintenance Schedules is done through the Maintenance tab under Endpoints.
The Maintenance Schedule Library contains the Schedules you have created.
Note: If a server is not connected to a maintenance schedule and is added to a Remediation Plan, it will not run and the RP will be suspended.
Create a new Maintenance Schedule
- Select Maintenance Schedules from the main menu
- Click on
- Fill in the relevant details: Maintenance Schedule Name, Description, Time Zone
- Click Save
- Click Add Schedule Entry
- Fill in the relevant details: Schedule Entry Name, Description, From and To Date, Repeat Type.
- Click Save
Maintenance Schedule Library
- The Search bar at the top left corner will enable you to search through the Maintenance Schedules by name.
- In the table, you will see the number of computers assigned to each Schedule.
- You can Edit, Delete, or Unassign all computers by clicking on the action button on the right.
- The Unassign all computers option will only appear when there are computers to unassign
3. Creating and Activating a Remediation Plan
Remediation Plans
Let’s Patch.
Patches > Patches Catalog
Remediation plans are like projects JetPatch automatically executes for you. You can also think about remediation plans as Policies. When a system does not comply with the policy JetPatch will create a mini-project – a remediation plan — to fix it. Each Remediation Plan consists of patches, what action should be taken with each patch, and how the patch should be deployed on specific endpoint groups (workflows).
Remediation plans are created automatically or manually. Automatic remediation plans are marked with a ‘#’ sign and manual RPs are marked with a ‘user icon’ on the remediation plan board.
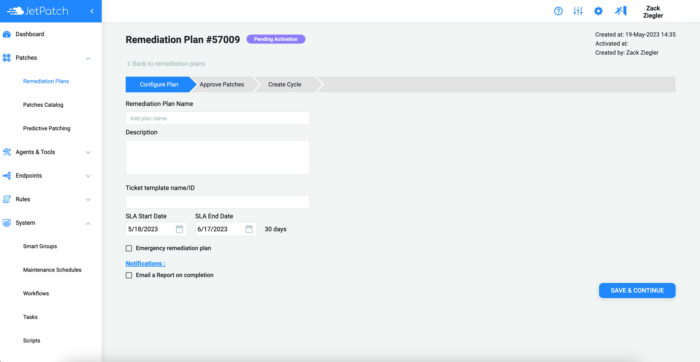
After creating the remediation plan (manually or automatically), the next step is to activate it. To make sure the remediation plan runs successfully, it is best to run through the Patching Checklist. Once you complete the checklist, click on “Remediation Plans”, go to the Remediation Plan Dashboard and click on the Edit button of the relevant remediation plan and go through all the steps until you reach ‘Save and Activate’.
It is important to note that there is a 30 minute buffer at the end of the maintenance window to ensure there will not be any patching activities outside the maintenance window. For more information related to buffer times, see this article: Is there a patch buffer window?
Manual Patching
- Select the Patches you would like to install. To easily create a Remediation Plan, you can filter by the specific patch name, patch severity, category, etc.
- Click on

- Give a Remediation Plan Name and Description and then select ‘Save and Continue’
- Select Emergency Plan if plans need to be done urgently and this will allow for you to change the maintenance schedule solely for this plan
- Select the actions you would like to perform on the patches: Bulk Install/Remove/Not Approved/Decline. You can also add patches to the Remediation Plan by clicking on the “Edit Patches” button. Then select ‘Save and Continue’
- Then, you will need to select the computer groups you would like to install the patches on and the Workflow you would like JetPatch to follow before and after Patch deployment.
- Once you’re done, click on ‘Save Cycle’ to save, but not activate the plan or select ‘Save and Activate’ to activate the plan. Once the plan is saved or activated, it should move to “New” or “Pending” respectfully, in the remediation plan board.
Patches > Remediation Plans
Automatic remediation plans group all patches that are not part of any other remediation plan and are needed on at least one endpoint in the environment. Patches can be grouped in one automatic remediation plan or separated into critical and non-critical remediation plans, based on defined JetPatch system settings. Critical remediation plans will be created or updated every 24 hours, assuming JetPatch discovered new critical patches. Non Critical remediation plans are created every 30 days. More information about automatic plans here.
As long as the remediation plan is in the new column of the remediation plan board, additional new patches are added to it automatically (based on system configuration). Once the remediation plan is activated, no additional patches will be added to it and a new remediation plan is automatically created.
Automatic Patching
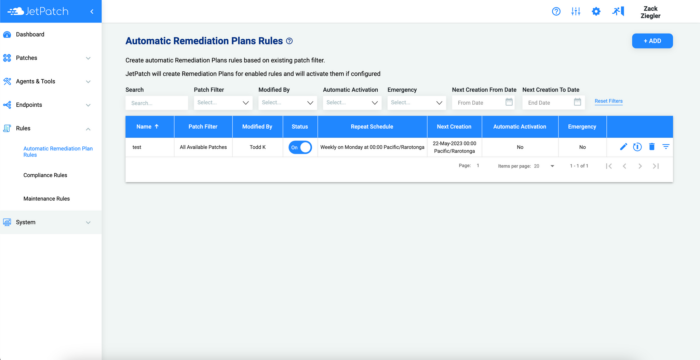
- Click ‘Rules’ and then ‘Automatic Remediation Plan Rules’ to access the Automatic Remediation Plan Rules table.
- Select to start creating a new rule
- Give name and filter. Filters are created in the patches catalog and can be saved.
- Select how often you would like your plan to repeat and then give a timezone.
- If you would like a plan to be created right after saving the automatic rules being created, select ‘Create a Plan Now.’
- If you would like the plan to be activated upon creation (not only for plans that have been created now), select ‘Activate the Plan on Creation’
- Select a workflow for each OS
- Lastly, enable automatic creation on the top right to turn on the automatic plan rule created
Remediation Plan Board
The remediation plan board provides real-time visibility for all remediation plans.
Remediation plans are placed in the following columns:
Table Key
- New: All newly created remediation plans and rejected remediation plans will be listed here.
- Pending: All remediation plans that were activated and pending for approval from ITSM. NOTE: If JetPatch is not integrated with an ITSM (such as ServiceNow or JIRA), the remediation plan will automatically move from Pending to In Progress after a few seconds).
- In Progress: Remediation plans that are currently being executed.
- Completed: Lists all remediation plans that have finished patch deployment
- Archived – a completed remediation plan can be moved to the Archived column by the user.
Predictive Patching
Make sure there are no issues before you even patch
Patches > Predictive Patching

There are many ways you can go about Predictive Patching; one is based on your environment, and the other based on your remediation plans. If you were to click run patching simulation without filtering your environment, predictive patching will automatically test your entire environment.
In addition, you can access predictive patching through the remediation plan board after creating a plan. If you look at the plans we have made you’ll see that there is a predict icon. When clicked upon, the predictive patching filter will be applied for this remediation plan and automatically run to show the success of the plan.
Environment
- Select the Environment tab
- Select OS and or Endpoint Group(s)
- Select Run Patching Simulation
Remediation Plan
- Select the Remediation Plan tab
- Select Remediation Plan(s)
- Give a start and end time estimate of when the plan(s) will be executed
- Select Run Patching Simulation
Endpoint Readiness
Setting up your machines so they’re ready to go.
Endpoints > Readiness
When you first launch endpoint readiness, the feature will be disabled so you’ll have to go to settings and enable it. Endpoint Readiness allows for a specific breakdown of your endpoints to make sure they are ready to be patched and can help when first setting up your environment.
In addition, this feature has the ability to update the status of the machines at given intervals of your choice and check for the last time the machines have checked into the WSUS server.
Adding Linux Repository Configuration
- Go to Settings
- Click
- Give Name, OS, and CIDR list – Specify the endpoint needed to be configured to the configured repository using CIDR entry
- List of enabled repositories IDs. To fetch the repository ID from an endpoint
- For Windows OS: The IP/Hostname of the WSUS appears in the endpoint configuration as specified in “Specify intranet Microsoft update service location”. More information on EP configuration can be found in WSUS Configuration (“Endpoint server configuration” section)
- For Linux OS:
- YUM based systems -“yum repolist -v” or “yum repolist all -v ” (to see disabled repositories also). The value for the settings should be the same as the “Repo-id”.
- ZYPPER based systems – “zypper repost”. The value for the settings is under the “Alias” column.
- Note: You can also run the built-in endpoint readiness script to gather this information for Linux OS
- Select save Repository
Workflows, Tasks & Scripts
Everything you will need for pre- and post-patching
System > Workflows
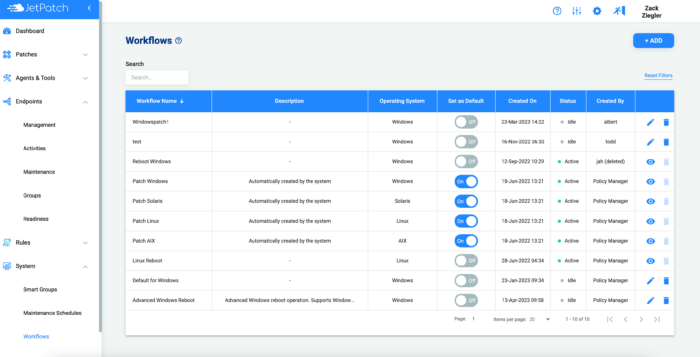
When creating a remediation plan, you will be asked to create a Workflow. The workflow contains pre and post-deployment tasks. Before creating the workflow, you should add tasks and scripts to your library.
Workflows that were not executed can be edited (no “In progress” remediation plan is currently using them)
Creating a New Workflow
- Select Workflows under System on the main menu
- Click on
- Fill in the relevant details: Workflow name, Operating System and Pre+Post tasks.
- Click save
Editing an Existing Workflow
- Select Workflows under System on the main menu
- Click on the actions button to your right :
- Set as default: When creating remediation plans, this will be the default workflow selected when deploying the patches.
- Edit (
 )→ You can edit your workflow tasks, name, etc.
 - Delete (
 ) → The workflow will be deleted from your library. (Can be done only if the workflow is not used)
 - View (
 ) → Allows you to see the details and pre+post tasks, although you cannot edit them.
System > Tasks
Tasks contain the deployment parameters you want to use in different remediation plans. When creating a task you can use a Script, an Execution Line or both. Before creating the Task, you should add scripts to your library.
The Task Library contains the tasks you have created.

Creating a New Task
- Select Tasks from the main menu
- Click on
- Fill in the relevant details:
- Task name
- Description
- Task execution: Choose Script, Execution Line, or Both (you will be asked to add in the relevant information for each option).
- Execution preview
- Timeout (in seconds)
- Click save
Task Library
- Searching through the table can be done by :
- Filter Option: Script, Category, Created by
- The search bar: Task Name, Script Name, Category, Created by
- You can Edit, Copy, or Delete Tasks by clicking on the action button on the right.
System > Scripts
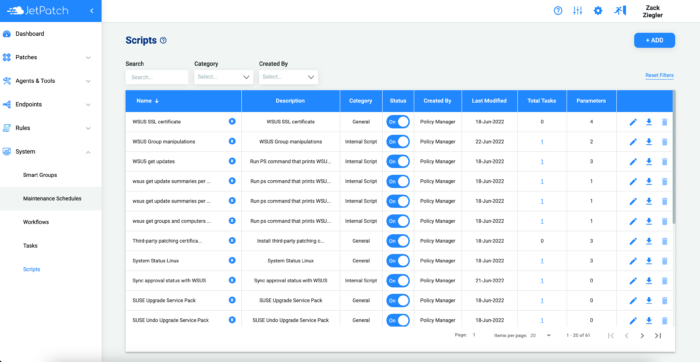
Here you can enter your installation specifications for the different patches. Scripts can be either uploaded files or one-liner scripts written directly into the console. Each script must be connected to a task and can’t run independently.
The Script Library contains the Scripts you have created.
Creating a New Script
- Select Script from main menu
- Click on
- Fill in the relevant details:
- Script name
- Description
- Category
- Operating system (choose from Dropdown)
- Script source, you can either:
- Upload file
- Add a One-liner script
- Run type
- Exit codes
- Parameters
- New scripts are set as Enabled, you can change the setting in the top right corner of the pop-up box.
- Click Save
Script Library
- Searching through the table can be done by:
- Filter Option: Category, Created by
- The search bar: Script Name, Category, Created by
- You can Edit, Delete, and Download Scripts by clicking on the action button on the right.
Monitoring Your Environment
Know what’s going on at all times
Patches > Remediation Plans
Under every remediation plan, there is a compliance report. This report can be downloaded and tracks the plan throughout its patching process. You will be able to see how the endpoints are interacting with the patches and vice versa to give you a complete overview of the plan. More Information here
Endpoints > Activities

The Activities page will show every step of the plan as it is executed and then present whether it was successfully completed or not. This includes the process of workflows as well. If you want to narrow down and make sure your system is updating properly, you can filter on System under the ‘Task Type’ drop-down menu to check for any potential issues.
General Reports
The general report can be found on Endpoints pages (readiness, groups, maintenance, activities, management) and Patches pages (predictive patching, patches catalog, remediation plans – both at the summary level or within individual compliance reports). All these reports can be downloaded in a CSV format by clicking on the Download as CSV (![]() ) button.
) button.